Api网关 Ocelot 快速入门

.Net 平台的 Api网关 工具(中间件)有 Ocelot,连微软,腾讯都在使用,赶紧来围观一下吧。

为什么需要网关

当我们将一个庞大的系统切分成若干个微服务后,需要一个网关工具(中间件)来做统一的入口。

以微软的官方示例项目 eShopOnContainers 来讲,微软将一个电商网站切分成:
Basket、Catalog、Identity、Location、Marketing、Ordering、Payment, 7个微服务。
那么部署的时候至少要部署成 7个可访问地址,
前端工程师开发 Android,IOS,H5 调用Api的时候,当然希望有一个统一的入口。

通常网关工具还会有其它功能,比如:限流、熔断、负载均衡等,
但作为快速入门,我们先着眼网关最基本也是最核心的路由功能。

Ocelot 快速入门

本篇的目标就是练习 Ocelot 官方的这张图:
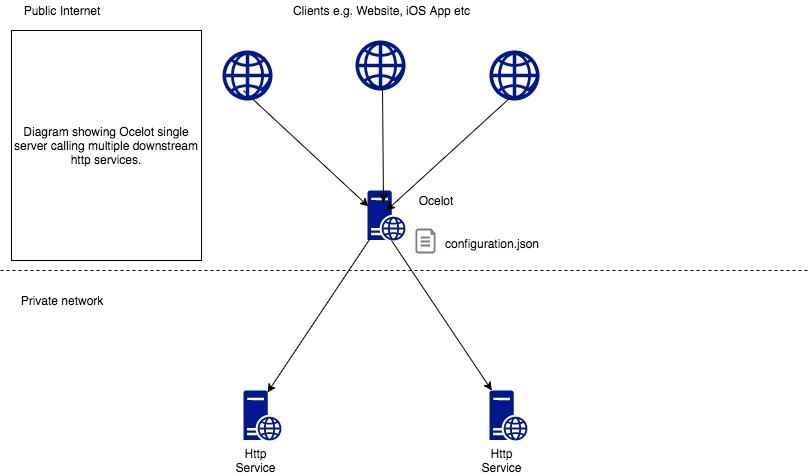
OcelotBasic

也就是当我们,
请求 http://sample.com/catalog/values 网关会将我们的请求转发(路由)到部署 Catalog 项目的 HttpService;
请求 http://sample.com/Order/values 网关会将我们的请求转发(路由)到部署 Ordering 项目的 HttpService;

首先创建解决方案 eShop,
然后在 eShop 下添加 3个项目:Catalog、Ordering、OcelotGateWay。
项目都是 Asp.Net Core WebApi,不需要身份验证,也不需要 Https。
解决方案结构如下:

1
2
3
4
eShop
├── Catalog // 产品的 WebApi
├── OcelotGateWay // 网关
└── Ordering // 订单的 WebApi

因为网关需要知道下游的服务地址,
所以分别右击项目 → 属性调试Web 服务器设置应用 URL(P):
修改启动时的访问地址:

1
2
3
4
eShop
├── Catalog // 产品的 WebApi 访问地址为 http://localhost:7001
├── OcelotGateWay // 网关 访问地址为 http://localhost:7000
└── Ordering // 订单的 WebApi 访问地址为 http://localhost:7002

右击 解决方案'eShop'属性通用属性启动项目多个启动项目(M):
调整 启动顺序 和 操作:
| 项目 | 操作 |
| ————- | —- |
| Catalog | 启动 |
| Ordering | 启动 |
| OcelotGateWay | 启动 |

点击 启动 或 按 F5,那么 3个项目都会启动起来,并且输入内容为:
[“value1”,”value2”]

项目准备好了,让我们添加点代码来实现网关功能吧~

使用 NuGetOcelotGateWay 项目,添加 Ocelot
并在该项目下创建一个 ocelot.json 文件,
ocelot.json 文件的内容如下:

1
2
3
4
5
6
7
8
9
10
11
12
13
14
15
16
17
18
19
20
21
22
23
24
25
26
27
28
29
30
31
32
33
34
35
36
37
38
39
40
41
42
43
44
45
46
47
48
49
50
51
52
53
54
55
56
57
58
59
60
61
62
63
64
65
66
67
68
69
70
71
72
73
74
75
76
77
78
79
80
81
82
83
84
85
86
87
88
89
90
91
92
93
94
95
96
{
"ReRoutes": [
{
"DownstreamPathTemplate": "/api/{everything}",
"DownstreamScheme": "http",
"DownstreamHostAndPorts": [
{
"Host": "localhost",
"Port": 7001
}
],
"UpstreamPathTemplate": "/catalog/{everything}",
"UpstreamHttpMethod": [ "Get", "Post" ]
},
{
"DownstreamPathTemplate": "/api/{everything}",
"DownstreamScheme": "http",
"DownstreamHostAndPorts": [
{
"Host": "localhost",
"Port": 7002
}
],
"UpstreamPathTemplate": "/order/{everything}",
"UpstreamHttpMethod": [ "Get", "Post" ]
}
],
"GlobalConfiguration": {

}
}
```

右击 `ocelot.json` 文件 → `属性` → `复制到输出目录` → 选择 `如果比较新则复制`

读者先自行猜测一下配置文件的作用把,
友情提示:
* ReRoutes : 路由
* Downstream : 下游服务配置
* Upstream : 上游服务配置

接着将 `OcelotGateWay` 项目的 `Program.cs` 文件修改成如下:

``` cs
using System;
using System.Collections.Generic;
using System.IO;
using System.Linq;
using System.Threading.Tasks;
using Microsoft.AspNetCore.Builder;
using Microsoft.AspNetCore.Hosting;
using Microsoft.Extensions.Configuration;
using Microsoft.Extensions.Logging;
using Microsoft.Extensions.DependencyInjection;

using Ocelot.DependencyInjection;
using Ocelot.Middleware;


namespace OcelotGateWay
{
public class Program
{
public static void Main(string[] args)
{
new WebHostBuilder()
.UseKestrel()
.UseContentRoot(Directory.GetCurrentDirectory())
.ConfigureAppConfiguration((hostingContext, config) =>
{
config
.SetBasePath(hostingContext.HostingEnvironment.ContentRootPath)
.AddJsonFile("appsettings.json", true, true)
.AddJsonFile("ocelot.json") // 加载 Ocelot 配置
.AddEnvironmentVariables();
})
.ConfigureServices(s => {
s.AddOcelot();
})
.ConfigureLogging((hostingContext, logging) =>
{
//add your logging
})
.Configure(app =>
{
app.UseOcelot().Wait();
})
.Build()
.Run();
}

//public static IWebHostBuilder CreateWebHostBuilder(string[] args) =>
// WebHost.CreateDefaultBuilder(args)
// .UseStartup<Startup>();
}
}

以上就已经实现了网关的路由功能了,下面的代码是为了方便检测结果。

接着将 Catalog 项目的 ValuesController.cs 文件修改成如下:

1
2
3
4
5
6
7
8
9
10
11
12
13
14
15
16
17
18
19
20
21
22
23
24
25
26
27
using System;
using System.Collections.Generic;
using System.Linq;
using System.Text;
using System.Threading.Tasks;

using Microsoft.AspNetCore.Http;
using Microsoft.AspNetCore.Mvc;
using Microsoft.AspNetCore.Http.Extensions;

namespace Catalog.Controllers
{
[Route("api/[controller]")]
[ApiController]
public class ValuesController : ControllerBase
{
// GET api/values
[HttpGet]
public ActionResult<IEnumerable<string>> Get()
{
return new string[] {
"value from Catalog",
HttpContext.Request.GetEncodedUrl(),
};
}
}
}

接着将 Ordering 项目的 ValuesController.cs 文件修改成如下:

1
2
3
4
5
6
7
8
9
10
11
12
13
14
15
16
17
18
19
20
21
22
23
24
25
26
27
using System;
using System.Collections.Generic;
using System.Linq;
using System.Text;
using System.Threading.Tasks;

using Microsoft.AspNetCore.Http;
using Microsoft.AspNetCore.Mvc;
using Microsoft.AspNetCore.Http.Extensions;

namespace Ordering.Controllers
{
[Route("api/[controller]")]
[ApiController]
public class ValuesController : ControllerBase
{
// GET api/values
[HttpGet]
public ActionResult<IEnumerable<string>> Get()
{
return new string[] {
"value from Ordering",
HttpContext.Request.GetEncodedUrl()
};
}
}
}

点击 启动 或 按 F5,让 3个项目都会启动起来。

请求 http://localhost:7000/catalog/values 会得到:
[“value from Catalog”,”http://localhost:7001/api/values"]

请求 http://localhost:7000/order/values 会得到:
[“value from Ordering”,”http://localhost:7002/api/values"]

自此,怎么用 Ocelot 实现简单的网关功能演示完毕~

新的挑战

Ocelot 的使用配置文件的方式还不够灵活,
思考一下:
单身狗节大促销,到时候网站访问量会暴增。
于是希望将 Catalog 部署成 m个节点,Ordering 部署成 n个节点,实现负载均衡。
并且在随时 添加节点 和 移除节点 的时候,不希望修改 ocelot.json 文件,
要怎么做呢?

请看下一篇 Consul 的介绍。

最后附上:Ocelot 官方文档

觉得文章对您有帮助,请我喝瓶肥宅快乐水可好 (๑•̀ㅂ•́)و✧
  • 本文作者: 阿彬~
  • 本文链接: https://iweixubin.github.io/posts/ocelot-quick-start/
  • 版权声明: 本博客所有文章除特别声明外,均采用 BY-NC-SA 许可协议。转载请注明出处!
  • 免责声明:本媒体部分图片,版权归原作者所有。因条件限制,无法找到来源和作者未进行标注。
         如果侵犯到您的权益,请与我联系删除